Written on March 14, 2012 at 12:00 pm by Michelle
Filed under: Article with tags: blythe on a budget, diy, kenner blythe, restoration tips
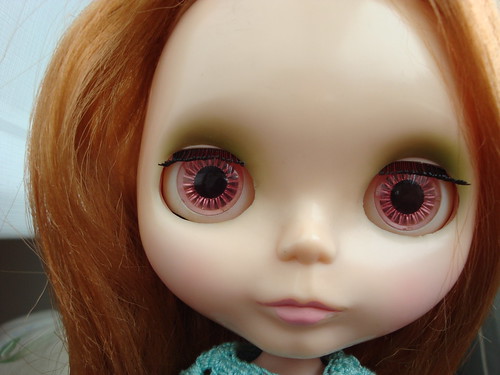
My first Kenner love, Emmalynn, came with no visible blush. What I really wanted to do was to add some colour back to her chubby plastic cheeks and I thought I’d share how I did that. This is a temporary method, there’s no permanent change to the plastic of the faceplate and it is reversible.
You will need:
- A doll in need of blush
- Pink chalk pastels
- Cotton ball or cotton pad
- Water
I bought my chalk pastels at my local dollar store. You can also find chalk pastels at art stores or online. I’ll be using the colour in the upper right hand corner.

I first cleaned my doll’s cheeks with some water, I wanted to make sure that the surface was clean before adding chalk pastels. You can also use soap, but I just use plain water on a tissue paper and give it a nice swipe.
I then used the cotton pad and pressed it to the chalk pastel and make sure that I get some colour on it. Then I dab the pastel to where I want her to have blush on her face plate.
I don’t rub the chalk pastel, I just dab. And I repeat until I’m satisfied with how her blush looks. There will be excess chalk dust, I blew this off. And then I have a blushy looking Kenner that’s ready for a photo or two.
To remove the chalk pastels, you can wipe it off with water. It will also come off with rubbing alcohol.
This was the results of my chalk pastel-ing. I was going for a slightly blushy look and I didn’t want it overwhelming, I think I got some nice results. I may try for more blush later, but for now I’m happy with it:
Written on March 7, 2012 at 12:00 pm by Michelle
Filed under: Article with tags: blythe on a budget, picnik
The ever so popular photo editing online program Picnik (which you’ve probably heard of through Flickr) is closing as of April 19, 2012. For a lot of people, this means a sudden loss in a photo editing program. Not everyone can afford Photoshop or Paint Shop Pro, so I’ve come up with a list of a few free photo editing programs that you may want to consider as an alternative to Picnik after it goes away for good. I’ve also listed a few pros and cons to each option to hopefully help you consider which program you’d like to try.
GIMP (The GNU Image Manipulation Program)

Pros:
- Comparable to Adobe Photoshop, Paint Shop Pro
- Compatible with Windows and Mac operating systems
- Great for both light and more advanced photo manipulation work
Cons:
- Contains a lot more features than most people would need (can be overwhelming)
Paint.NET

Pros:
- Comparable with Adobe Photoshop, Paint Shop Pro and GIMP
- Super small file size for the program (fast loading)
Cons:
- Compatible with Windows only, not Mac operating systems
- Contains a lot more features than most people would need (can be overwhelming)
Picasa (Google)

Pros:
- Picasa can be used to edit and upload images onto the web
- Linked to Picasa albums (via your Google account), Google+
- Contains most regularly used features for light manipulation
Cons:
- Newest version available is for Windows only, no Linux or Mac
PhotoScape

Pros:
- Has a lot of familiar features from Picnik (eg. frames, speech bubbles) that are easy to add
- Batch editing
Cons:
- Compatible with Windows only
Written on February 24, 2012 at 12:00 pm by Michelle
Filed under: Article with tags: freebie friday five
Every month’s last Friday (or just once a month, sometime on a Friday) is part of a feature on BlytheLife.com, Freebie Friday Five. Welcome everyone to this month’s instalment! I mention 5 things I love every month that’s free to do/read/see.
If you have any suggestions for next month’s Freebie Friday Five, please don’t hesitate to email me! Maybe you have a site you think that I should feature or a pattern that’s free and up on the web? Tell me!
For the month of February, I wanted to highlight some creative and fun sites. I hope you enjoy them as much as I have!
- Because I love Kenners (and lets just talk about Kenners some more), I’ve been reading up on how-to’s and tips on fixing up Kenners again over at This is Blythe. You do need an account to read the posts! Current favourite thread is about cleaning and repair tips. Accounts on This is Blythe are free.
- On Flickr, there’s many groups that I love, but lately I’ve been looking at Blytheopedia because I’m a little unfamiliar about some of the newer releases (haven’t really been paying attention!) so I’ve gone back to see all the stock promotional photos and illustrations that I’ve missed.
- For those that craft, there is a Blythe group on Ravelry (account is needed!). It’s called Knitting for Blythe, but they also discuss customization, sewing, crocheting and (of course) dolly goodness in general! Accounts on Ravelry are free.
- It’s winter around here (and everywhere else in the northern hemisphere) and the sun goes away fairly early still. I found a tutorial on how to take better photos in low light without using flash, so I thought I’d share it for fellow amateur photographers!
- I’ve been looking at printable miniatures again. My favourites lately have been little cereal boxes and you can find more on this page.
If you know of a site, group or activity that you think I should highlight in next month’s Freebie Friday Five, let me know! Comment below or email me.
Written on February 10, 2012 at 12:00 pm by Michelle
Filed under: Article with tags: kenner blythe, restoration tips

Hello, hello! It’s been a while since I really blogged about Emmalynn, the lovely 1972 Kenner Blythe that I got back in late 2011. She hasn’t gotten a whole lot of photo time because she spent quite a bit of time in pieces (I’m a bad doll owner, I know). To recap (for those who didn’t read the original posts), here is the laundry list of things that I did in my quest to restore my vintage beauty to her original glory:
- Removed her scalp and hard cap; loose hair plugs were secured (with thread) and scalp tears were reinforced
- Multiple baths for her (a spa wouldn’t be complete without getting rid of the musty smell of old plastic)
- Partline rethatched (!)
- Multiple hair treatments with fabric softener, hot water and foam rollers
- Opening of head to clean out some grime and her eyeballs
- Gluing her pelvic seam crack
- Reinserting her poor legs back in (finally!)
- Replacing her scalp onto her head
Click to read more of this entry.
Written on February 1, 2012 at 12:00 pm by Michelle
Filed under: Article with tags: blythe on a budget

Image from stock.xhng user przybysz.
Valentine’s Day is in a very short two weeks! Why not show your Blythes that you love them by helping them celebrate it? After all, you should show your appreciation for your dolls as well as other loved ones in your life. Some great things about Valentine’s is that there are a lot of inexpensive options out there and I checked out my local dollar store to see what was available:
- Fine sand paper ($1 per package) – perfect for reducing that shine
- Red, pink and white felt ($1/3 sheets) – nothing says “I love you” like a new coat
- Lace ribbon ($1/spool) – good for trims or even has a hair ribbon for your favourite doll
- Pink and white yarn ($1/ball) – it’s time to show you care with a new sweater for your plastic love
- White, water soluble glue ($1/bottle) – might not be Aleene’s, but it’ll still work for eye chips
- Hair elastics, hair barrettes ($1/package) – shiny little baubles for your favourite doll’s hair
- Boxed Valentine cards ($1/box) – show that you love, with something that says that you do
There are a lot of things that you can find at your local dollar store that can be used for your dolls, above are just some examples. As for me? I opted for buying a few sheets of felt for some craft projects, and picked up a sheet of baby pink felt for Blythe projects.


 BlytheLife.com opened in July 2010 and is a blog and resource hub for all things Blythe!