blythelife.com
blythelife.com

Blythe On A Budget: 10 Holiday Photo Ideas

Written on December 22, 2010 at 12:00 pm by Michelle
Filed under: Article with tags:

I’m sometimes at a loss for what to do around the holiday season with my dolls and a lot of other people come up with a lot more creative things than I do, but I wanted to share a little list of photo ideas you can do with your dolls this holiday season:

  1. Take them with you to the mall and get your photo taken with Santa (the Blythe On A Budget method would to hold your doll up and get a good angle so you can block out the child and still get Santa in the photo).
  2. Make the shape of a snow angel in the snow and gently lay your Blythe in the indentation.
  3. Have your doll in a mess of wrapping paper, tissue paper and ribbon.
  4. Have your Blythe hiding in the tree and have people try to figure out where she is.
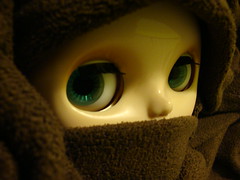
  5. Have Blythe poking her head out of a stocking.
  6. Have Blythe head first in the stocking, trying to get to the good stuff at the bottom.
  7. Pose your Blythe next to the glass of milk (or bottle of beer) and cookies. Or have her trying to sneak a cookie.
  8. Have your Blythes opening presents for them or have your Blythes exchanging holiday gifts.
  9. Wrap your dolls in garland and hang small ornaments off of them.
  10. Strategically cover your doll with candy canes.

This is the last post from BlytheLife.com before Christmas, so I wanted to wish everyone a happy holidays! New blog posts will resume on Monday, December 27th.

Blythe On A Budget: 10 Random Photo Ideas

Written on December 15, 2010 at 12:00 pm by Michelle
Filed under: Article with tags:

I love Blythe and I love taking photos. Couple this with my love for lists and blogging and what do you get? A list of incredibly random photo ideas that you can use for just about anything. If you’re doing a 365 project, perhaps? Or maybe you just want to take more photos but aren’t sure of what, exactly, to do with your dolls. My slightly kooky and random mind is always available to lend a hand with ten interesting ideas for photos that won’t cost you very much at all besides some time and a little imagination!

16/365 - Sophie...?

  1. Put your Blythe amongst a lot of other toys. This works well if you still have a lot of your childhood toys, have a child who has a lot of toys or you’re an adult who’s a child at heart with a lot of other toys. Turn it into an I Spy kind of game with a list of things for people to find.
  2. Put your Blythe into a (clean!) flower pot and make tissue paper petals to put around her head. If you plant a Blythe, will you end up with more Blythes?
  3. Have a lot of books? Do a photo with dolly bookends! (I would do this. But I have a lot books. Like a lot of books. There’s no room for dolls on my shelves anymore. Or for more books, for that matter.)
  4. If you’re going to do some baking… I know some certain dolls that would probably like to help (or eat). Blythes and cupcakes go exceptionally well together. (Note: Please do not put your dolls into the oven. EVER. This is meant to be an idea of you taking photos of your newly-baked-but-taken-out-of-the-oven-and-cooled-down-cupcakes with dolls kind of photos. Please do not bake your dolls. Or cook them. Or broil them. Or fry them. Thank you.)
  5. Blythes and mirrors! Experiment with angles so you can get your Blythe’s reflection without your own. Very fun and very cool.
  6. Do a photo of your Blythe with all the doll clothes that you have. Let your doll go swimming in high fashion!
  7. Even better than #6: Blythe with a lot of shoes. Be sure to hide all your dolly’s bits!
  8. Ever gaze out your window? How about doing a photo of your Blythe gazing out the window? With so much emotion and attitude that can come out of our favourite doll’s eyes, it’s sure to be a good one!
  9. How do you normally carry your Blythe around? In your hand? In your purse? In a cup holder? Take a photo and share with the rest of us how your Blythe goes around in style!
  10. Take a photo of you and your Blythe. Do you look alike? Do you have matching styles or clothes? Do a twins photo! If you’re shy, you can always hold your Blythe in front of your face while taking the photo.

Spotlight On: Dollypedia.com

Written on December 13, 2010 at 12:00 pm by Michelle
Filed under: Article

Lynn, who is also known in the Blythe community by her screen name natsukigirl, recently unveiled the wiki-portion of her fantastic website: dollypedia.com!

In the future, Dollypedia will have a community section as well, but right now the wiki section has been open! It’s a lot like Wikipedia where people can create and edit pages. Unlike Wikipedia, it doesn’t allow for anonymous people to edit things, so you should go ahead and create an account over there!

Dollypedia is only going to be successfully if we all pitch in to write something, it’s the only way that a big community-written encyclopedia for dolls is going to be done and it’s a great way to give back to the doll community (no matter what kind of doll you happen to collect, love and own) by writing up a little something.

There’s a lot of things you could write about, seeing as how new and shiny it is right now. You could write about Blythe, Kenner Blythe, ADG Blythes. You could write about ball-jointed dolls or wooden dolls or perhaps mass-produced dolls like Barbie, Moxie Girlz, Liv dolls. You could write about a lot of things to do with dolls and as long as it’s about and related to dolls and you’re not selling anything, everything goes!

So go, go, go check out the Dollypedia.com wiki and go make your mark!

Blythe On A Budget: DIY Holiday Cards

Written on December 8, 2010 at 12:00 pm by Michelle
Filed under: Article with tags: , ,

This week is a simple little DIY project for you: making Christmas (or any other holiday) cards for your dolls!

What you’ll need is:

  • Cardstock or paper in any colour – you can most certainly use scrap pieces and I encourage it!
  • Pens – thin ones in multiple colours
  • Little holiday-stickers
  • White-out/correction pens
  • Scissors
  • Ruler (optional!)

10124566 So I found these scrap pieces of coloured paper that were mostly square to begin with, I’m going to pretend that they are. I folded over the edge until I had a size of a card that I liked (one half of the card is 1.5″ x 1″ – so unfolded the card is 3″ x 1″). You can cut out as many or as little of these as you liked – I decided to cut out 7 of these so I would have 1 card per doll.

I like to use my ruler to make sure I get a really good crease on the fold so it doesn’t look like a wimpy fold (is there such thing as a wimpy fold?). Once you’ve got a good fold into the cardstock, you can go ahead and decorate the front however you want.

You can choose to write something on the inside (or not), it’s entirely up to you. Depending on if you like to decorate forĀ  your dolls so they can celebrate the holidays as well, you could put up a string and hang a bunch of the cards up, like so:

10124567

Isn’t that pretty nifty?

If you decide to make some holiday cards for your dolls, be sure to share them here!

Blythe On A Budget: DIY Felt Slippers

Written on December 1, 2010 at 12:00 pm by Michelle
Filed under: Article with tags: ,

10114531 A certain trio of Prima Dolly Blythes come with little slippers, and another certain yellow-headed Blythe comes with a pair of little slippers as well! I set out to make a few pairs of cute little felt slippers for my dolls and here’s what I did:

You will need:

  • Felt – You can find this at dollar stores and craft stores, they generally have a lot of different colours. There is acrylic felt (which is generally cheaper) and wool felt (which can be more expensive, and you’re less likely to find this at dollar stores).
  • Thread – Matching the colour of your felt or a contrasting colour.
  • Sewing needle
  • Needle Theader (optional)
  • Scissors
  • Pencil or Pen
  • Scrap paper
  • Decorations – Ribbons, little gems/rhinestones, beads, little fake silk flowers, etc.

What I did first was trace around my doll’s foot. It’s okay if it’s not entirely even because it’s just a rough trace, you can even out the lines and such after. Once you’ve traced it, you’ll want to make sure your lines are even and that the slipper base is symmetrical (so you won’t have to have a left and a right slipper).

10114524

I drew lines to see where the edges around my doll’s foot was and then added some more to it at all sides so there’d be extra fabric needed (or else the slipper wasn’t about to get on.

10114525

The two paper pieces I used for cutting out my felt pieces. You’ll want to cut out 2 of the half-slipper pieces and 2 of the slipper base pieces.

If you trace the completed slipper base again, put your doll’s foot on top of it and figure out where you want the top of the slipper to go. Draw a line and when you’re happy with that, cut out that piece as well.

You can either pin the paper pieces to the felt or hold it in place when you cut. You’ll want to cut 2 slipper bases and 2 slipper tops.

10114528

My felt pieces: 2 slipper bases and 2 slipper tops!

10114529 If you’re going to add decorations to the top of the slippers, now would be a good time to do it. Try your best to put the decorations on at the same spot on both pieces.

Once that’s done, you’ll want to match up the pieces to each other and then sew it together.

I used a straight stitch, which is simply going in and out of the felt. You can experiment with different types of stitches for a different look.

And there you have it, one pair of completed felt slippers for your doll that you made yourself! You can make a pair of each of your dolls or perhaps even make them slippers that will match their favourite pajamas? Be sure to share photos of the slippers you’ve made!

« Newer EntriesOlder Entries »
blythelife.com
blythelife.com