blythelife.com
blythelife.com

Blythe On A Budget: DIY Felt Slippers

Written on December 1, 2010 at 12:00 pm by Michelle
Filed under: Article with tags: ,

10114531 A certain trio of Prima Dolly Blythes come with little slippers, and another certain yellow-headed Blythe comes with a pair of little slippers as well! I set out to make a few pairs of cute little felt slippers for my dolls and here’s what I did:

You will need:

  • Felt – You can find this at dollar stores and craft stores, they generally have a lot of different colours. There is acrylic felt (which is generally cheaper) and wool felt (which can be more expensive, and you’re less likely to find this at dollar stores).
  • Thread – Matching the colour of your felt or a contrasting colour.
  • Sewing needle
  • Needle Theader (optional)
  • Scissors
  • Pencil or Pen
  • Scrap paper
  • Decorations – Ribbons, little gems/rhinestones, beads, little fake silk flowers, etc.

What I did first was trace around my doll’s foot. It’s okay if it’s not entirely even because it’s just a rough trace, you can even out the lines and such after. Once you’ve traced it, you’ll want to make sure your lines are even and that the slipper base is symmetrical (so you won’t have to have a left and a right slipper).

10114524

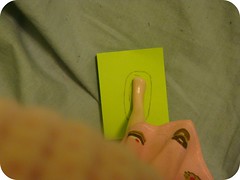
I drew lines to see where the edges around my doll’s foot was and then added some more to it at all sides so there’d be extra fabric needed (or else the slipper wasn’t about to get on.

10114525

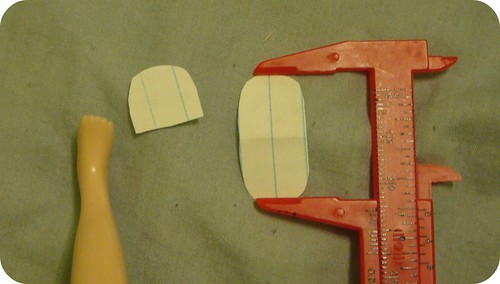
The two paper pieces I used for cutting out my felt pieces. You’ll want to cut out 2 of the half-slipper pieces and 2 of the slipper base pieces.

If you trace the completed slipper base again, put your doll’s foot on top of it and figure out where you want the top of the slipper to go. Draw a line and when you’re happy with that, cut out that piece as well.

You can either pin the paper pieces to the felt or hold it in place when you cut. You’ll want to cut 2 slipper bases and 2 slipper tops.

10114528

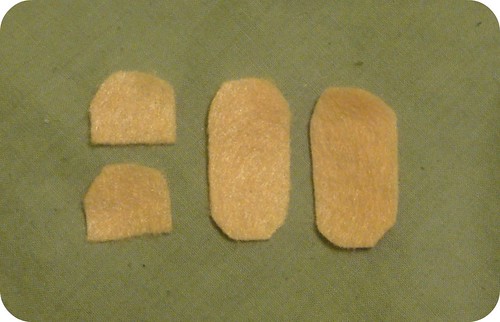
My felt pieces: 2 slipper bases and 2 slipper tops!

10114529 If you’re going to add decorations to the top of the slippers, now would be a good time to do it. Try your best to put the decorations on at the same spot on both pieces.

Once that’s done, you’ll want to match up the pieces to each other and then sew it together.

I used a straight stitch, which is simply going in and out of the felt. You can experiment with different types of stitches for a different look.

And there you have it, one pair of completed felt slippers for your doll that you made yourself! You can make a pair of each of your dolls or perhaps even make them slippers that will match their favourite pajamas? Be sure to share photos of the slippers you’ve made!

Blythe On A Budget: Photo Hosting Options

Written on November 24, 2010 at 12:00 pm by Michelle
Filed under: Article with tags:

Since photography’s such a huge part of the Blythe hobby, it’s always a good idea to know what your options are for uploading photos.

Flickr’s a very popular option – it’s free to use for up to 200 photos and after that, the older ones ‘disappear’ (if you ever go onto a paid account – which is $24.95/year – and all your old and disappeared photos will come back!) as there a lot of Blythe hobbyists on Flickr and there are a lot of Flickr groups that you can join and it makes it easy to search for photos of your favourite dolls (and all those Blythes that you don’t own yet).

But Flickr is not the be all and end all to image hosting websites. There are a lot of free image hosting options available and what you can consider are:

Hope you have fun sharing photos! If you have any other suggestions for image hosting solutions, please let me know in the comments below and I’ll add them to the list!

Blythe On A Budget: Photo Backgrounds

Written on November 17, 2010 at 12:00 pm by Michelle
Filed under: Article with tags:

One of the big things about the Blythe hobby is taking photos of your dolls and I love taking photos of my own dolls. I’m always trying to think of new places to take photos of my Blythes, I’m not as comfortable with taking photos of them outside of my house – but I do on occasion. I’ve taken photos of my Blythes while at the dentist, in the park, at the aquarium, in my backyard and (for the most part) in my bedroom or other parts of my house. There’s a lot of great places that you can take photos of your dolls, but because this is a budget-friendly article, I should suggest places that it’s free for you to enter. Which, you know, takes places like “the aquarium” out of the running – because that costs money. However, if you’re planning on going to the aquarium anyways (or have a membership!), it’s totally fun take photos of Blythe at the aquarium.

Keep your arms to yourself, buster!

  • Local parks/gardens
  • Your own backyard or places in or around your house
  • The grocery store
  • The parking lot
  • The playground – if it’s at a school and you’re an adult, you will probably want to avoid the playground during school hours due to laws and such
  • The bookstore
  • Having an image up on your television set or laptop and then taking a photo of your doll in front of it

Blythe On A Budget: Discreet Stands for Photos

Written on November 10, 2010 at 12:00 pm by Michelle
Filed under: Article with tags:

There’s some photographers out there who take photos of Blythe and it looks like that their doll is standing all by herself. What’s the trick to it? Is it that they have excellent Photoshopping skills? Is it that they have a magical Blythe who really can stand all by herself? Or perhaps they just happen to use some discrete stands and a whole lot of good photography angles in order to get that great photo to share. My bets are on the excellent Photoshopping skills and the discreet stands.

What you want to do with the stand is have them at an angle and propped up against the doll’s back or behind their head (think of a 45° angle between the ground and the stand if the doll’s completely perpendicular to the ground).

Some ideas for what you could use as a stand include:

  • Forks
  • Skewers
  • Chopsticks
  • Sticks
  • Toothbrushes (I especially like using the bristled part to hold up against their necks)

Regardless of what you choose to use as a stand, the doll really comes to mind when you pose them in a way you would expect a human to pose – knees bent a little, perhaps the head turned to one side, arms down or out. What angle you take the photo at,  how much light is available – it all changes how a photo could turn out.

If you are, however, interested in doing a little bit of photo manipulation and don’t have a copy of Photoshop or find it too expensive (this is Blythe On A Budget, after all!) you can check out the free photo manipulation program, GIMP, for all your photo manipulation needs.

Happy photo taking!

Blythe On A Budget: 10 Dollar Store Photo Props

Written on November 3, 2010 at 12:00 pm by Michelle
Filed under: Article with tags:

I went to the dollar store recently and went around looking for the ten most interesting (and hopefully useful!) photo props that I could see that were listed at only $1 each and here’s what I came up with:

  1. Paper drink umbrellas
  2. Food-shaped erasers
  3. Dolly chair (bright yellow plastic but probably easily painted over with the right type of paint)
  4. Small stuffed animals (~3″ tall)
  5. Fabric butterflies (supposed to be used as room decorations, I think)
  6. Party streamers (2 packages for $1)
  7. Plastic martini glasses (supposed to be for wedding favours)
  8. Mini bells (supposed to be Christmas tree decorations)
  9. Earrings (replace your doll’s earrings or use the charms as a holdable item?)
  10. Mini playing cards keychain (don’t your girls want to engage a little poker game?)

While all dollar stores are different and they offer different products all the time and might not even have the same item in stock from one day to the next – it’s always fun to do some exploring and go through all the aisles and see what there is to see. Go into the store with just enough cash for one or two items to keep without your monthly dolly budget!

« Newer EntriesOlder Entries »
blythelife.com
blythelife.com