Written on April 11, 2012 at 12:00 pm by Michelle
Filed under: Freebies with tags: customizing, diy
Jen made up this fancy little face-up chart when she was sending off one of her dolls to get customized and she’s decided to share it with all of you here at BlytheLife.com! It’s a great tool if you’re sending a doll off to get customized (and want to make sure that the customizer understands what you want) or if you’re customizing a doll for yourself and want to do a bit of planning first!
The face-up chart is available as a PDF download here at BlytheLife, you will need a PDF reader in order to view it on your computer.
Some programs that you can use: Adobe Acrobat and Foxit Reader.
Feel free to print the chart off for your customizing uses, but remember to keep the credits information at the bottom of the page!
Please check out Jen’s Flickr photostream (Dolls Crystals and PositivelyStoned) as well as her website, PositivelyStoned.com.

Click here to download a PDF copy of the Blythe Face Chart!
Thank you so much, Jen, for this fantastic Blythe resource!
—
Do you have a Blythe resource or something that you’d like to contribute to BlytheLife.com? Find out how you can contribute here!
Written on March 14, 2012 at 12:00 pm by Michelle
Filed under: Article with tags: blythe on a budget, diy, kenner blythe, restoration tips
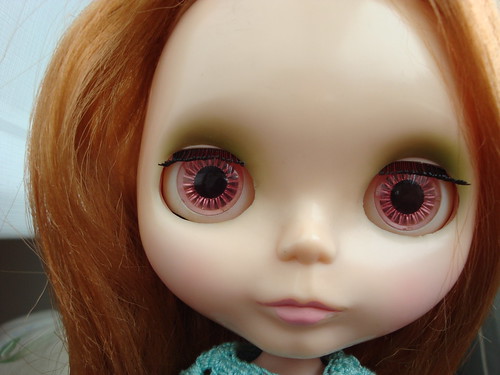
My first Kenner love, Emmalynn, came with no visible blush. What I really wanted to do was to add some colour back to her chubby plastic cheeks and I thought I’d share how I did that. This is a temporary method, there’s no permanent change to the plastic of the faceplate and it is reversible.
You will need:
- A doll in need of blush
- Pink chalk pastels
- Cotton ball or cotton pad
- Water
I bought my chalk pastels at my local dollar store. You can also find chalk pastels at art stores or online. I’ll be using the colour in the upper right hand corner.

I first cleaned my doll’s cheeks with some water, I wanted to make sure that the surface was clean before adding chalk pastels. You can also use soap, but I just use plain water on a tissue paper and give it a nice swipe.
I then used the cotton pad and pressed it to the chalk pastel and make sure that I get some colour on it. Then I dab the pastel to where I want her to have blush on her face plate.
I don’t rub the chalk pastel, I just dab. And I repeat until I’m satisfied with how her blush looks. There will be excess chalk dust, I blew this off. And then I have a blushy looking Kenner that’s ready for a photo or two.
To remove the chalk pastels, you can wipe it off with water. It will also come off with rubbing alcohol.
This was the results of my chalk pastel-ing. I was going for a slightly blushy look and I didn’t want it overwhelming, I think I got some nice results. I may try for more blush later, but for now I’m happy with it:
Written on August 24, 2011 at 12:00 pm by Michelle
Filed under: Article with tags: blythe on a budget, crafting, diy
I love the look of mini-buttons on doll clothing. They’re super adorable and they come in all sorts of colours. My main problem? Even though they’re (somewhat) readily available in scrapbooking sections of stores, the pricing is at a few dollars for less than 20 buttons. If you go online, you’re paying a smaller price for a larger amount (lowest I’ve seen is $2.50 for 100 buttons) but you get all of the same colour. And while I can appreciate beauty of small plastic buttons, there needs to be some kind of alternative that doesn’t cost as much.
It’s been in style lately for human clothing to have large buttons – why not transfer that idea over to doll clothing? If you have buttons that came off of your own clothing, you can still use them! Make a nice peacoat for your dolls and use ‘large’ buttons on the jacket to mimic fashions for people!
Seedbeads are small and come in some fantastic colours! You can buy a lot for very little money – some places will even sell mixed packages or vials for a low cost. This can be great because the beads are an appropriate scale for dolly clothing, but at the fraction of the price of the plastic buttons. You can find them at dollar stores at $1 for a vial or a bag. You can also find them at craft stores. They come in various colours (solid colours, milky, translucent) and can be made out of plastic or glass.
Craft your own mini-buttons! Get some polymer clay and make them for yourself. Just a reminder that they will end up very thin so your best bet for curing the polymer clay is to boil them rather than to put them in a oven (they’re likely to burn). Quite possibly the more expensive of the three ideas, but polymer clay comes in great colours and you can make them the same size as the miniature buttons without completely breaking the bank. And when you’ve made enough buttons in the colour you have, you can use the clay to make something else entirely (maybe make your own doll-scale foods?).
Written on June 15, 2011 at 12:00 pm by Michelle
Filed under: Article with tags: blythe on a budget, crafting, diy

Supplies Needed
- 3mm knitting needles
- Sock/fingering weight yarn (under 10g required [under 42m or 45.9yd])
- Yarn/darning needle
- Snaps
- Sewing needle and thread (matching colour to yarn)
- Ruler
- Decorations (buttons, ribbons, appliques) – optional
Gauge:
3 st per 1 cm
Notes
The yarn used in the dress shown is Regia Jacquard Color 4-ply by Schachenmayr nomotta in colour #5176 (50g per 210m or 230 yards)
Total number of stitches per row mentioned in brackets [#] at end of the row.
Casting off is also known as binding off.

Directions
Cast on 54 (leave a long enough tail at beginning for sewing up the back of the dress; I use the long-tail cast-on)
Knit 3 rows (garter) [54]
Alternate knit and purl rows (stockinette) until total length is 7cm [54]
(On knit side, decrease row): *k1, k2tog* [34]
Knit 6 rows even [34]
Knit 7, cast-off 3, knit 14, cast-off 3, knit 7 [28]
Knit 7, cast-on 4, knit 14, cast-on 4, knit 7 [36]
Knit 2 rows even [36]
Cast-off
Use yarn needle to sew up the back (up to the decrease row).
Sew a snap at the top of the back of the dress, add decorations as desired.

Notes on Pattern Use
This pattern may be used for personal or commercial use provided that full credit is given to BlytheLife.com/Michelle for the pattern (please include a link to the website or pattern page in your sales description). This pattern is not for mass-production manufacturing. You may not sell or claim the pattern as your own. If you have any questions regarding these terms, please email Michelle at michelle@blythelife.com.
Written on May 25, 2011 at 12:00 pm by Michelle
Filed under: Article with tags: blythe on a budget, clothes, crafting, diy, sewing

When I was younger, my parents refused to go out and buy clothes for my Barbie dolls beyond what came with the doll herself. But I still wanted new clothes for my dolls so my dad used to sew some for me, just to placate me long enough for me to stop from whining more. One of the things he used to make for me was little sweaters and dresses from socks, so with his help I wrote this tutorial.
Pretty much all of the directions are his, minus the use of stabilizer (I have no clue how he was patient enough to sew doll clothes for me with socks without stabilizer, I had a hard enough time with it!).

You will need:
- 1 sock (I bought mine from a local dollar store, kids sizes at 3 pairs for $2 CAD)
- scissors
- stabilizer (makes your life so much easier)
- thread (either the same colour as your sock or similar)
- pencil (or something else to mark fabric with)
- pins
- sewing machine
Click to read more of this entry.


 BlytheLife.com opened in July 2010 and is a blog and resource hub for all things Blythe!