


 BlytheLife.com opened in July 2010 and is a blog and resource hub for all things Blythe!


From Kenner Fever to Cured – Part 3
Written on November 4, 2011 at 12:00 pm by MichelleFiled under: Article, Musings with tags: kenner blythe, restoration tips
From Kenner Fever to Cured is a three-part mini series of me detailing my journey from just being feverish with wants of a Kenner Blythe to actually getting my first Kenner, an absolute dream girl. In Part 3, I include a lot of information about what I did to do some restoration work on my Kenner Blythe.
This is what worked for me, if you don’t feel comfortable doing work on your vintage Blythe, please send it to someone with experience restoring the dolls to their fullest potential. I am not a professional Kenner restorer at all, so please take that into account when you read about what I did. Where possible, I reference the source of where I learned these tips from.
I left off part 2 of From Kenner Fever to Cured about my Kenner Blythe’s hair. It smelled and it most certainly needed a wash. Also, what I didn’t mention last time is that when I had gone to thatch her hair, I may have found the old exoskeleton of an insect’s moult. While I love entomology and all that goes on with insects and their habits, that was really gross. And so I needed to clean her hair – immediately.
Washing her hair wasn’t too much of an ordeal compared to when I first washed the hair of my very first Blythe (Sophie – Cappuccino Chat). For starters, my Kenner’s hair was not attached to her head. I just filled the sink up with hot water and put in a little bit of soap in there. There are a lot of people who tell you different things about what to use on doll hair. The most important thing to note is that whatever product you use to clean her hair, it has to be washed out. I don’t care if it’s fabric softener, dish soap or regular liquid hand soap – it needs to be washed out completely. Human shampoos or conditioners will not do much for doll hair because those are for human hair (eg. natural fibre, hair proteins, etc.) while doll hair is plastic (gorgeous and silky feeling, but still plastic).
I just decided on a nice mild baby shampoo because I have it on hand (it was a sample, yay for free cleaning products). It had a light scent and I just cleaned through the doll’s hair with it. I didn’t really work it into her hair, but rather to just get all the hair nice and soaked and then run soapy water through it. The water was a bit dingy afterwards and her hair had more a sheen when it dried, so I would like to think that it somewhat worked! Seeing as how Kenners are nearly 40 years old, that’s a lot of time to collect dust and other grimey things in their long hair.
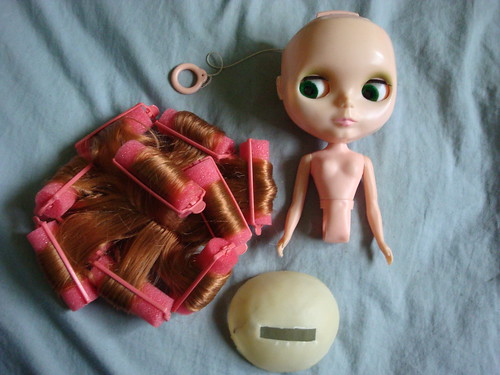
After rinsing thoroughly, I used a fine-tooth comb to comb through her hair – I start at the ends and work my way up near the scalp. Always comb in small sections at a time, and I hold the hair when I’m combing it so I don’t pull on it. This way I won’t pull out more hair from the doll’s scalp but also you won’t stretch the hair. Stretching the doll’s hair is what causes it to be frizzy because it gets pulled and stretched. When I was done with one section, I put her hair into foam curlers. This is both because a lot of people seem to put their Kenners into curlers and because it was a nice easy way to get the hair out of my way as I worked on the next section.
Tip! You can find foam hair rollers in the beauty section of department stores or at dollar stores. My local dollar store carried them at $1 for 8 rollers and they feel the same as the more expensive ones from department stores. Fine-tooth combs can also be found in both locations. The supplies needed to work on her hair should not cost an arm and a leg!
I’d resigned myself to the fact that she was pretty much going to have to live with the fact that she has frizzy ends. But on the brightside, with her hair combed out, it looked like she had a lot more hair than I originally thought (due to how her hair looked in both auction photos and when I first pulled her out of the box). Her hair was a lot longer and while she did have two bald spots (one due to 3 missing plugs, the other due to a section of scalp that had never been rooted in the factory where she was made), her hair was gorgeous and shinier after getting washed.
On a side note, redhead Kenners will occasionally have discolouration in their hairs that has a slight greenish tinge. Emmalynn is no different – she has slight green in a few of her plugs at the front of her scalp. I like it though, it’s quite pretty. Some redheads will have the greenish discolouration through all of their hair or just part of it. One theory that I’ve read about this greenish discolouration is due to the hair’s exposure to the sun.
After the initial washing, I took her hair out of the curlers and then felt her hair. I really did feel like this could be improved, so I took a microwaveable dish and put some fabric softener (please, if you going to do this, make sure you used something that does not contain any dyes!) and water in it. I microwaved this concoction for 2 minutes on high and then pulled it out. I wanted the water hot, but not boiling. and then I put the scalp into the fabric softener and water mixture and I covered the top of the container to prevent the heat from leaving. I left it like that for more than 30 minutes. Then I went and rinsed the fabric softener out of the scalp and hair as best that I could (using hot water directly from the tap) and set to work combing and putting her hair back into rollers.
Tip! Whatever fabric softener you decide to use, make sure it doesn’t contain any dyes and that it has a scent that you can stand (or use unscented!). If you don’t have liquid fabric softener handy (or if your liquid fabric softener has dyes or a strong smell), I’ve also been known to take fabric softener sheets and put those in water as well. It does work, it’s not as strong compared to using liquid fabric softener though.
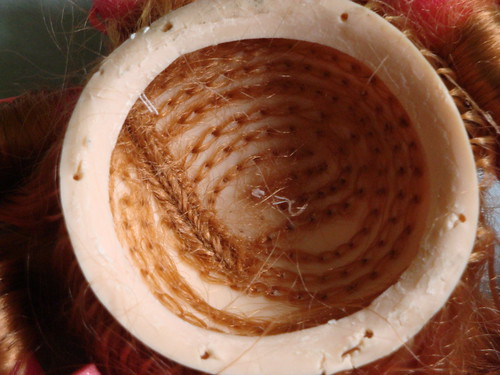
With her hair sorted out, I waited until the next day to put a very small amount of water soluble glue onto the thread knots on the inside of her scalp. The brand of glue I used was Aleene’s (the one we all know and love when we swap out eyechips on our Blythes!) and I allowed the glue to dry for several hours before even thinking about handling her scalp again.
At this point, there were only two things left that I wanted to do to fix her up: fix the pelvic seam crack and to open up her head because after finding an insect exoskeleton, I didn’t want to leave her head dirty inside too. Plus I really wanted to give her eyeballs a bit of a cleaning and couldn’t get at some of the parts just from the outside.
Opening up a Kenner’s head isn’t as difficult as it may seem. Once you remove the scalp and hardcap, two more screws are revealed. In total there are four screws holding the two halves of the doll’s head together. Also, remember to unhook the spring if you want to keep it (and to not stretch it out). The screws or spring may be rusty – you can always bring the screws into a hardware store and ask someone to help you find some replacements! And if your doll’s spring is rusty, you can either replace it with a Takara or ADG Blythe’s spring or you can find other replacement options online or locally (I know that Cool Cat carries replacements and that some people have suggested the springs from pens as well).
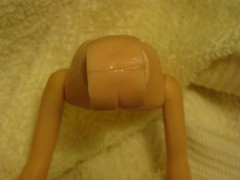
Kenners can have cracks all over their bodies. Some have cracks in the torso, some have cracks in the pelvis, some have cracks in both places. My Kenner had a crack right along the seam of the pelvis (where the two halves of the mold met during production of the piece). It’s a common place for a crack to occur – the seam is a ‘weak’ spot. in the piece. Other parts of the Kenner’s body can have cracks as well, but I will only be talking about this one as that’s what I’m presented with.
I learned about company called Loctite, which is a brand name, that makes epoxies and glues. I found a particular product called Super Glue All Plastics – 2 Part. It’s designed and is safe for all types of plastics and is a two-part system. I got it at a local hardware store for ~$6+tax (CAD). I had removed my Kenner’s head from the rest of her body when I repaired the crack. Or rather, I had my boyfriend help me repair the crack. My job was to make sure that the pelvic area was clean and had removed the legs (which already pop out anyways -they had been cleaned separately from the rest of her body).
Tip! There are great resources on both on the This Is Blythe and Blythe Kingdom forums. I learned about the Loctite Super Glue for plastics over on TIB on the thread about Kenner cleaning and repair tips. There are a lot of other fantastic tips for cleaning your doll and repairing her to her former glory.
You don’t necessarily need to use this specific product, but whatever glue product that you do use for fixing cracks needs to be safe for use on plastics (specifically, hard plastics – but it’s best to find one that’s safe for all plastics as the glued seam will likely come in contact with the legs of the doll)
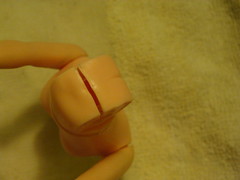
The doll pelvis was put into a clamp (cushioned on both sides to prevent marks from the clamp) and then we put the glue into the crack and turned the clamp to push the sides back together again. Always read the instructions of adhesives before using them! It’s supposed to be an instant bond, but I’m a touch paranoid about needing to do this again because of my unwillingness to wait, so she stayed in the clamp for a bit before I took her out and then attempted to push her legs back in. It failed to hold and the crack opened up again. I tried a second attempt of gluing the pelvic crack back together again and left it in for a much longer period of time – the glue failed to hold under the pressure of pushing the leg back into the socket even with putting the plastic into hot water first to made it more pliable.
With my caliper (calipers are super useful if you’re ever interested in making jewellery, one of my other hobbies) I measured the gap with the legs in. It’s just a smidge over 3mm (but before 4mm). No amount of gluing and clamping is going to make that glue hold. Why? Because different plastics have different shrink rates. They also react differently with the present of things like humidity, elevational pressure, to make a few variables. The plastic of the torso/pelvis and the legs are different. The holes in the pelvis for the legs are smaller than the plastic joint on the legs themselves.
I still have my boyfriend enlisted in helping me out figuring out what to do with the crack – his current mission is to find an epoxy that will work for a Kenner pelvis.
So she’s not completely restored yet, she’s still waiting for that medical miracle to fix that little issue she has with her pelvis. It makes sitting rather uncomfortable, as you can very well imagine. But while we’re waiting for the surgery that’ll fix her right up and make her good as new, she’s still part of the dolly family and I plan on including her in as many Blythe photos as possible (even if she’s currently not on a body).
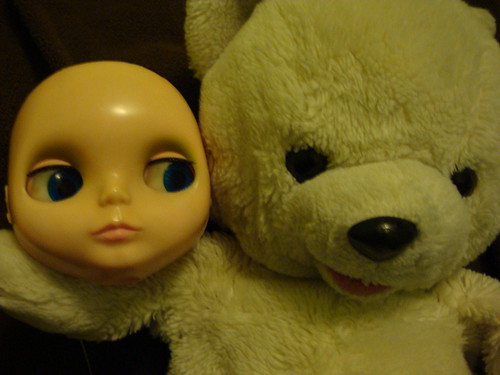
And this is my gorgeous Emmalynn, a seven-line, side-part redheaded 1972 Kenner Blythe. She’s older than me, sassier than me and I’m utterly in love. (She whispers to me about buying her expensive clothing that’s proportional to her worth, we’re still in negotiations.)
I hope you’ve all enjoyed the three part series of how I went from wanting a Kenner to winning an auction and how I took an expensive doll and restored her the best that I knew how (for now). I will be posting one final post about the restoration process of Emmalynn after I’ve figured out how to fix her body as I really do want to keep her on her original Kenner body. I don’t know when this will be, but I’m hoping it’ll be relatively soon.
Thank you so much to everyone who gave me support both on Twitter and on Flickr as I talked about my restoration process and when I sought out help and counsel for what I was doing.