Written on January 5, 2011 at 12:00 pm by Michelle
Filed under: Question of the Week with tags: blythe on a budget
For those who are new to BlytheLife.com, Blythe On A Budget is a mostly weekly article that comes out on Wednesdays that is all about enjoying the Blythe hobby without breaking the bank (or needing to rob one). It’s all to do with how to enjoy the hobby with what you have or without needing to spend a lot of money – this is great for those who are on a limited budget or just don’t want to overspend or just want to have fun (or all three).
What I’m interested in from you is:
What do you want to see next on Blythe On A Budget?
Give me your suggestions below in the comments! Do you have a great idea you want to share? How about something fun and exciting that you’ve done recently with your Blythe dolls that didn’t cost much at all? Share your thrifty experiences or ideas and you could see it showing up on a Blythe On A Budget installment later on this year!
Written on December 29, 2010 at 12:00 pm by Michelle
Filed under: Article with tags: blythe on a budget
For those that like to sew or create clothes for their dolls, it’s always a lot of fun to head out to the fabric and notions store and dig through remnants bins to find super cute pieces of fabric that everyone else seems to think is way too small for anything, but it’s definitely enough for a cute skirt or top or dress for your Blythe. But today’s article for Blythe On A Budget is to talk about various types of fabric that you could find in places other than the fabric store and also (perhaps) fabrics you may not have thought about using.
—
Felt: Felt is great to work with – it doesn’t fray, it’s easy to cut, you don’t need to hem. Felt comes in acrylic and wool varieties, there’s generally a huge variety of colours! You can find felt at craft stores, department stores with a craft aisle or your local dollar store. A dollar store that opened up near my house recently even has glittery sheets of felt that are priced the same as the regular non-glitter felt.
Mesh: While mesh can come in a lot of varieties, I’m thinking of the plastic pink or orange mesh that fruit or even cheese comes in sometimes! It’s cute, it comes with your produce purchase and it’s always great to find another use for it. You can use it as a layer of fabric underneath a skirt (a lot like tulle) or as a fabric overlay on a skirt or dress, which would look super cute on any Blythe fashionista!
Paper: Have you ever wanted to wrap your doll up for the holidays or as a present? Why bother with a box? Some wrapping paper can be so colourful and have cute prints, so why not reuse them to create a doll dress? You can fold paper to create pleats, darts or just shape the neckline. While it may be delicate, paper might just be the thing you’re looking for in creating a one-time-use outfit that can be recycled after you’re done taking photos.
Terry Cloth: Which comes in the forms of tea towels and towels, for the most part. You can most definitely find these in dollar stores or just the clearance sections of a department store. I have bought a few in light colours for the sole purpose of turning into cute little bath robes for my dolls, but I have yet to successfully manage one that actually, well, fit. But for those with more expertise or skills in sewing, I’m sure it’s an easier feat for others.
Written on December 22, 2010 at 12:00 pm by Michelle
Filed under: Article with tags: blythe on a budget
I’m sometimes at a loss for what to do around the holiday season with my dolls and a lot of other people come up with a lot more creative things than I do, but I wanted to share a little list of photo ideas you can do with your dolls this holiday season:
- Take them with you to the mall and get your photo taken with Santa (the Blythe On A Budget method would to hold your doll up and get a good angle so you can block out the child and still get Santa in the photo).
- Make the shape of a snow angel in the snow and gently lay your Blythe in the indentation.
- Have your doll in a mess of wrapping paper, tissue paper and ribbon.
- Have your Blythe hiding in the tree and have people try to figure out where she is.
- Have Blythe poking her head out of a stocking.
- Have Blythe head first in the stocking, trying to get to the good stuff at the bottom.
- Pose your Blythe next to the glass of milk (or bottle of beer) and cookies. Or have her trying to sneak a cookie.
- Have your Blythes opening presents for them or have your Blythes exchanging holiday gifts.
- Wrap your dolls in garland and hang small ornaments off of them.
- Strategically cover your doll with candy canes.
This is the last post from BlytheLife.com before Christmas, so I wanted to wish everyone a happy holidays! New blog posts will resume on Monday, December 27th.
Written on December 15, 2010 at 12:00 pm by Michelle
Filed under: Article with tags: blythe on a budget
I love Blythe and I love taking photos. Couple this with my love for lists and blogging and what do you get? A list of incredibly random photo ideas that you can use for just about anything. If you’re doing a 365 project, perhaps? Or maybe you just want to take more photos but aren’t sure of what, exactly, to do with your dolls. My slightly kooky and random mind is always available to lend a hand with ten interesting ideas for photos that won’t cost you very much at all besides some time and a little imagination!
- Put your Blythe amongst a lot of other toys. This works well if you still have a lot of your childhood toys, have a child who has a lot of toys or you’re an adult who’s a child at heart with a lot of other toys. Turn it into an I Spy kind of game with a list of things for people to find.
- Put your Blythe into a (clean!) flower pot and make tissue paper petals to put around her head. If you plant a Blythe, will you end up with more Blythes?
- Have a lot of books? Do a photo with dolly bookends! (I would do this. But I have a lot books. Like a lot of books. There’s no room for dolls on my shelves anymore. Or for more books, for that matter.)
- If you’re going to do some baking… I know some certain dolls that would probably like to help (or eat). Blythes and cupcakes go exceptionally well together. (Note: Please do not put your dolls into the oven. EVER. This is meant to be an idea of you taking photos of your newly-baked-but-taken-out-of-the-oven-and-cooled-down-cupcakes with dolls kind of photos. Please do not bake your dolls. Or cook them. Or broil them. Or fry them. Thank you.)
- Blythes and mirrors! Experiment with angles so you can get your Blythe’s reflection without your own. Very fun and very cool.
- Do a photo of your Blythe with all the doll clothes that you have. Let your doll go swimming in high fashion!
- Even better than #6: Blythe with a lot of shoes. Be sure to hide all your dolly’s bits!
- Ever gaze out your window? How about doing a photo of your Blythe gazing out the window? With so much emotion and attitude that can come out of our favourite doll’s eyes, it’s sure to be a good one!
- How do you normally carry your Blythe around? In your hand? In your purse? In a cup holder? Take a photo and share with the rest of us how your Blythe goes around in style!
- Take a photo of you and your Blythe. Do you look alike? Do you have matching styles or clothes? Do a twins photo! If you’re shy, you can always hold your Blythe in front of your face while taking the photo.
Written on December 8, 2010 at 12:00 pm by Michelle
Filed under: Article with tags: blythe on a budget, crafting, diy
This week is a simple little DIY project for you: making Christmas (or any other holiday) cards for your dolls!
What you’ll need is:
- Cardstock or paper in any colour – you can most certainly use scrap pieces and I encourage it!
- Pens – thin ones in multiple colours
- Little holiday-stickers
- White-out/correction pens
- Scissors
- Ruler (optional!)
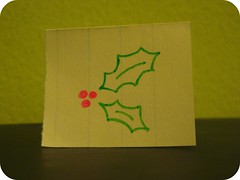 So I found these scrap pieces of coloured paper that were mostly square to begin with, I’m going to pretend that they are. I folded over the edge until I had a size of a card that I liked (one half of the card is 1.5″ x 1″ – so unfolded the card is 3″ x 1″). You can cut out as many or as little of these as you liked – I decided to cut out 7 of these so I would have 1 card per doll.
I like to use my ruler to make sure I get a really good crease on the fold so it doesn’t look like a wimpy fold (is there such thing as a wimpy fold?). Once you’ve got a good fold into the cardstock, you can go ahead and decorate the front however you want.
You can choose to write something on the inside (or not), it’s entirely up to you. Depending on if you like to decorate for your dolls so they can celebrate the holidays as well, you could put up a string and hang a bunch of the cards up, like so:
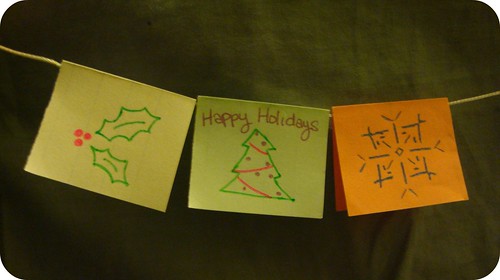
Isn’t that pretty nifty?
If you decide to make some holiday cards for your dolls, be sure to share them here!


 BlytheLife.com opened in July 2010 and is a blog and resource hub for all things Blythe!