


 BlytheLife.com opened in July 2010 and is a blog and resource hub for all things Blythe!


From Kenner Fever to Cured – Part 2
Written on October 21, 2011 at 12:00 pm by MichelleFiled under: Article, Musings with tags: kenner blythe, restoration tips
From Kenner Fever to Cured is a three-part mini series of me detailing my journey from just being feverish with wants of a Kenner Blythe to actually getting my first Kenner, an absolute dream girl. In Part 2, I include a lot of information about what I did to do some restoration work on my Kenner Blythe.
This is what worked for me, if you don’t feel comfortable doing work on your vintage Blythe, please send it to someone with experience restoring the dolls to their fullest potential. I am not a professional Kenner restorer at all, so please take that into account when you read about what I did. Where possible, I reference the source of where I learned these tips from.
When I last left off, I had been impatiently waiting for Canada Post to finally scan in the tracking number to let me know that yes, she was at least in the country! They took their on sweet time on it, of course. 3 days after the tracking number on UK’s Royal Mail website updated as having left the UK, Canada Post let me know that she had arrived! Two hours later, she was out of Customs and in the hands in the postal service. The postal carrier made an attempt to deliver her the next day, but unfortunately no one was home. So I waited (again, impatiently) until the next morning (October 4th) and went straight to the post office just ten minutes after they had opened.
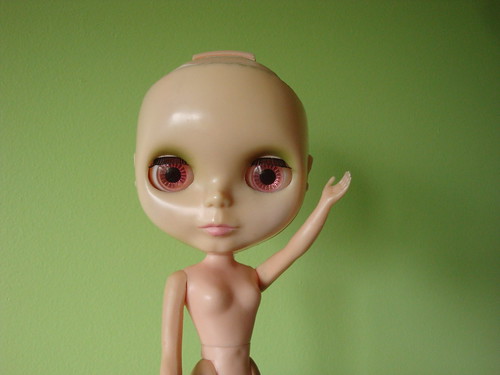
Within minutes of getting home, I had cut open the tape and pulled her out. My Kenner. And in the first hour of having her in my grabby hands, she was inspected, photographed and her scalp was taken off.
Tip! For those who are wanting to remove their Kenner’s scalp – I ran hot water from the tap directly along where the edges of her scalp are in order to soften the rubber enough to edge it out from under the hard cap. The scalp has a ‘lip’ that goes on the underside side of the hardcap. The construction of a Kenner’s head is pretty ingenious, I don’t know why Takara or ADG ever felt the need to use glue of all things when they had a simple (but effective) original construction to follow.
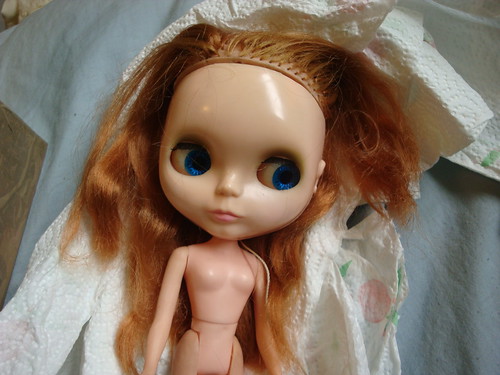
Upon first inspection, I made a mental list of all the flaws. She had frizzy ends, very little thatching left for her part, missing plugs (which means loose plugs!), one visible scalp tear (I later found out that she had more than one), very mild yellowing of the front faceplate, yellowing where the two faceplates meet, a small liprub, a horizontal pelvic crack (both legs come out very easily) and dirty legs (some of it came off, but I think an ink spot is destined to stay). So she needed a little bit of love to go back to the way she once was, but she was my little bit to love. She told me that her name is Emmalynn.
Even in all her naked glory, I knew she was something special. After all, I had just spent a bucketload of money on a vintage dolly, she’d better be something special! And looking back, I think the fact that I needed to spend some time and care on her just makes her even more special to me.
As I said, the first thing that I did was take her scalp off. Her auction listing had disclosed the missing plugs so I knew there’d be unsecured plugs that would need to be fixed before I did anything else. I lucked out though, the rubber of her scalp was super malleable and I had no issues turning it inside out in order to better get at the plugs that were hidden by the ‘lip’ of the scalp. I secured the loose plugs and sewed the scalp tears together in hopes that they won’t get any larger.
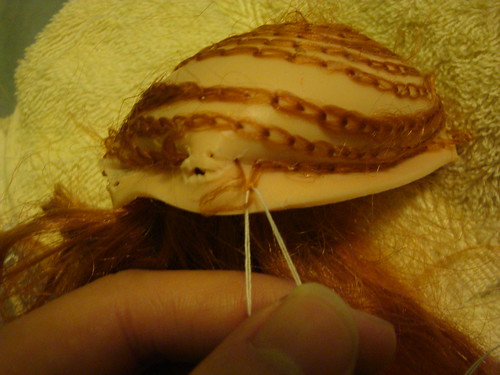
Tip! I asked for help when I wanted to learn how to secure the hair plugs. Michelle (aka coldlicorice) helped me out with how to secure the plugs. She used sewing thread to anchor the loose plug and then knotted it. What I did was (with doubled sewing thread) thread the loose plug and the one directly next to it. I knotted (several times) the thread until I was happy with it and then snipped the thread. Then I gently tugged the plugs into place. After I had finished working on her hair and was ready to put it back onto her head, I put very small amounts of water soluble glue (Aleene’s – the same glue recommended for eyechips!) on the knots and allowed it to dry fully before putting her back together again.
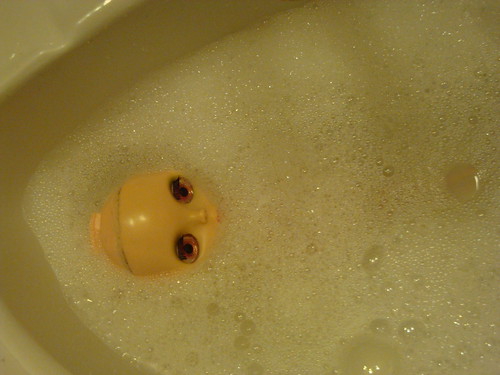
For day 2 of being a Kenner owner, I gave Emmalynn a bath. The neat thing about Kenners is that they won’t lose their stock lashes in water like Takaras will. They were produced without the use of water soluble glue so it’s okay to dunk them in water. I made her a bit of a bubble bath and cleaned her up a little. I cleaned her legs, especially. Some of the marks came off. I cleaned her torso and pelvic area and arms. I did part of her head. I was reluctant to really touch the face (her eyeshadow is all original and most of her lips are still there – I didn’t want to ruin that!). But I did clean the back plate with a soft toothbrush and that did work well! I also scrubbed (with a toothbrush) the area with dried scalp goo – there was grime on it and it looked a lot better afterwards. After rinsing her off (and out! as water can get into the head), I held her upside down to drain the water out of her head and put her to dry head down to make sure that as much of the water can get out as possible.
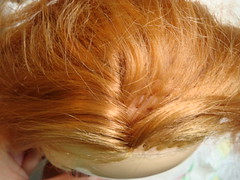
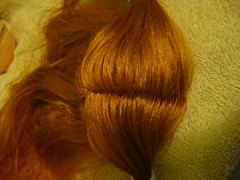
I also worked on her thatching! At this point I had not washed her hair yet. I really wanted to ‘fix’ as much of her hair as possible (which is why her scalp came off as soon as possible!). I had read about thatching hair before, so I knew roughly what it was like. Plugs on the left row go to the right, plugs on the right row go to the left. Easy, right? It took nearly three hours to finish thatching her part line. I was pleasantly surprised with myself because it was my first time thatching!
Tip! Thatching is where the partline rows are alternated left and right. There’s a great tutorial on how to thatch hair on Puchi Collective where they go over how to thatch the doll’s hair. The way that they teach how to ‘set’ the thatch is to cover the doll’s hair with a wet towel and then to iron the towel/doll’s hair. I ‘set’ my Kenner’s thatched with hot (from the tap only!) water instead. It’s still heated, which helps the hair stay, but without the risk of an iron. I’m still iffy about hot irons near my dolls. If you want to watch a great Youtube video about hair thatching, My Little Customs shows how to thatch hair on a Sindy doll (same concept, different doll).
Working on Emmalynn’s hair was fun, but she still had a slightly musky smell about her. Her body (which had been cleaned) smelled more like the soap I had used than anything else at this point. She smelled clean, but her hair? Not so much!
Okay, now I’m dying for Part 3!
Where’s part 3? I’m dying to see more pics of this beauty 🙂